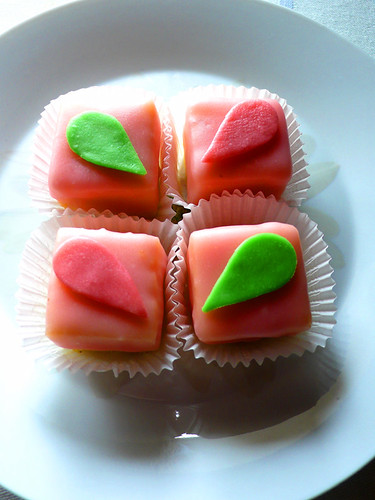
even though i grew up on a tropical island, the elementary school i attended was run by a southern colonel and his colourful wife. they were a social couple who enjoyed organizing events for the children and their families, including a headmaster's tea at the beginning of the school year, where he would formally introduce himself to "the troops." i have to say, i enjoyed these rather genteel events, which passed for exotic in our world, and absorbed all the details of finery and frippery that were presented to us.
so, i was rather excited to learn that the headmaster's tea was to be resurrected, decades after the colonel and his wife retired, with some of the trademark confections to return, including the petit fours that were the precious jewels of each of the silver platters of assorted cookies and biscuits that were served during the tea. they were nothing more than bite-sized cubes of sponge cake covered with fondant, but they were gaily coloured in easter pastel colours, with a tiny piped rosette on top, like a lovely little gift, just for you.
petit fours are typically small decorated cakes that are served at the end of a meal, but can also be any number of diminutive pastries. the name is french for "small ovens," and they were created as a way for bakers to use up leftovers at the end of the day, as the ovens were left to cool for the night. i've only tried making them a couple times previously, one of them being a white chocolate sponge creation for miss deborah. they turned out tasty, but i had difficulty in covering the cakes with something that could withstand the humid weather and remain adhering to the cake. although many petit fours can be quite elaborate, i knew i had to make 12 or more dozen, so i decided to go with a very simple iced cake confection, with a minimum of steps.
deciding what kind of cake was easy; i went with a pound cake, as it is sturdier than sponge, and with the amount of sugar in the icing, i thought the buttery, eggy cake would be a better balance. i used flo braker's recipe for apricot pound cake (obvs without the apricots), from her book, "the simple art of perfect baking." the cake was excellent--a beautiful, fine crumb, dense but not too heavy, fragrant with vanilla, and not too sweet (even if you do not make the petit fours, this turns out a great loaf ).
after quite a bit of research on the nets, i thought the best covering would be poured fondant, as it would dry to a smooth, hard finish. pre-made poured fondant isn't sold here, so i knew i would have to make it myself. i really wanted to find a recipe that was easy, fool-proof, and hopefully didn't involve corn syrup (which i don't like to use), nor a candy thermometer (eeek. not good with those either). i came across a few recipes, but they all involved the dreaded corn syrup and/or candy thermometer, or they were poorly reviewed. luckily, i did find a suggestion to thin out pre-made rolled fondant with simple syrup for a poured fondant icing, and that worked out remarkably well.
these petit fours are easy to make, but there are quite a few steps; i've broken it down into three sections: cake, icing, assembly. once you get these down, it will be a breeze. you can add more (layers of jam, chocolate, sugar syrup laced with liqueur, more decorations, whatever), or substitute cake or icing to your liking; the possibilities are endless, and the product almost always charming.
simple petit fours
semi-special equipment you will need:
rectangular baking pan (9"x13" or thereabouts)
ruler
microwaveable bowl
drying/cooling rack set on top of baking sheet lined with silicone mat or wax/parchment paper (for easy cleanup)
mini-muffin/cupcake liners (optional)
for the cake:
1. bake cake (here's the recipe for flo's pound cake) in rectangular baking pan that is greased, floured, and lined on the bottom with parchment. top tip: pound cakes will rise and crack in the middle; you can minimize (but not completely eliminate) the dome--in both a sheet cake and in a loaf--by pushing some of the batter towards the sides, or creating an even, shallow well in the center with a spatula (same difference).
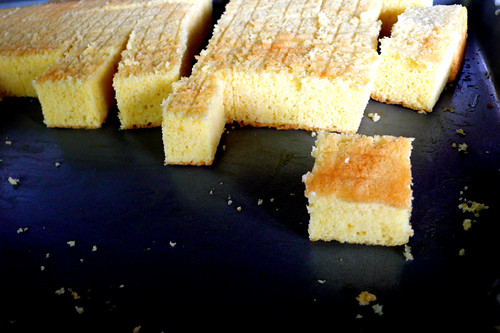
2. after cake has cooled down, put in refrigerator or freezer for at least three hours, or overnight--a cold cake is easier to cut, with less crumbing and crumbling. you can level the cake if doming on the cake is significant; if you are not too worried about the difference in the height of your cakes, then don't sweat it. i almost always ice my cakes bottom side up because it is a smoother, more even surface.
3. use a ruler as a guide to cut your cakes to size. i can't really recommend the best knife to cut cakes; i use a cheap OXO chef's knife because it has quite a thin blade which i find helpful. petit fours are about one inch square and 2 inches high, but feel free to cut them to whatever size with which you are most comfortable. my petit fours were 1 1/4-inches square and about 1 1/2-inches high, just because.
**
for the icing:
you will need:
rolled fondant
granulated sugar
water
lemon juice (optional)
other flavourings or extracts (optional)
food colour (optional)
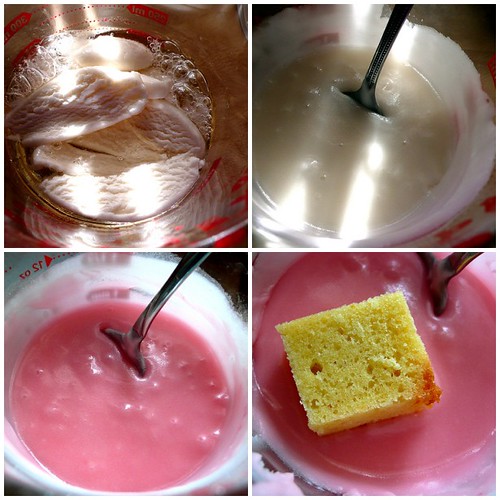
1. make or purchase rolled fondant--i made mine (that'll be covered in the next post), as well as the simple syrup. cut the fondant into one ounce pieces. note: the difference between simple syrup and sugar syrup is the ratio of sugar to water--simple syrup is 2:1, whilst sugar syrup is 1:1. use the simple syrup for this fondant icing recipe (sugar syrup can be mixed with liqueur or juice or any flavouring to brush on top of the cake for extra flavour if you want). i don't really know how much icing you'll need, but i made approximately one quart of icing for six dozen cake pieces (with quite a bit to spare).
2. heat simple syrup in a microwave, on high for 2-3 minutes in a microwaveable bowl. the syrup should be bubbling slowly. add fondant pieces, 1 or 2 at a time, stirring after each addition, until the fondant melts, and the icing reaches a sort of school glue-like consistency. you will use roughly one ounce of fondant for every 1/4-cup of simple syrup. if the icing is too thick, thin it out with warm water or lemon juice--added a teaspoonful at a time--until it reaches desired consistency. if it's too thin, you can add powdered or icing sugar to thicken it.
3. tint the icing with food colouring and/or add any flavouring; mix well.
assembly:
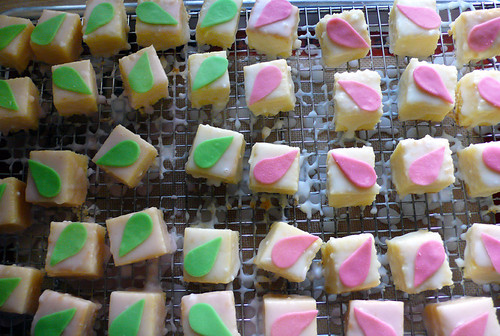
1. skewer cake pieces onto a bamboo skewer, or fork, or use your fingers if the icing is cool enough for this next step. dip the cake into the fondant icing; one plunging dip works better than a couple of shallow ones. allow most of the excess to run off the cake before placing it on a cooling rack fitted on a baking pan to dry. don't worry if you don't dip the cake completely or if it runs down too gloopily; once the petit four is in a decorative paper sleeve, you won't really see any blemishes on the sides.
2.while the cakes are drying, place any decorations you may want on top of the cake. non-pareils, sugar sprinkles, and candy work well, or you can cut out shapes from tinted rolled fondant. if the icing has already dried completely, brush a tiny bit of water on the surface of the cake so the decorations will adhere.
3. after the icing has set, place each petit four in a mini-cupcake liner. pack away in a clean, dry container.
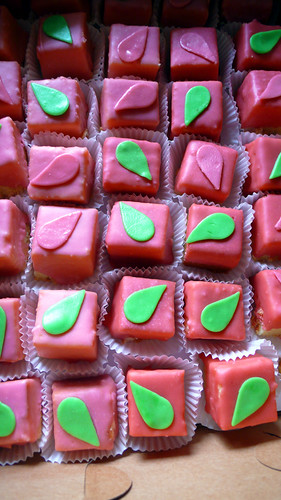
you can make the un-iced cake several days ahead and keep it refrigerated or frozen. any fondant decorations can also be made ahead, but kept in an airtight container in a cool, dry area. you *shouldn't* refrigerate the fondant as the colours tend to run once defrosting sets in. it's best to make the poured fondant icing just before use, however, as once cooled, the icing turns into a strange candy concrete; it can be reconstituted with a few drops of water and a quick zap in the microwave, but timing and amounts can be tricky. the petit fours themselves should be made the night before or same day as they are to be consumed; store them in a cool, dry place or in an airconditioned room, but not in the refrigerator.
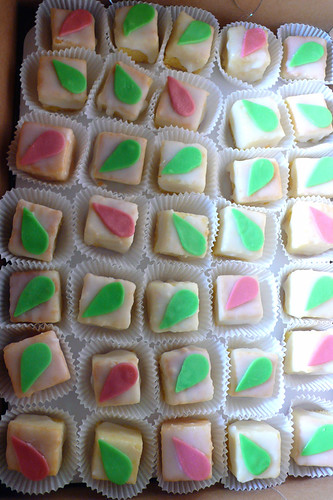
see? it's not all that difficult to create, and so totally worth the effort.

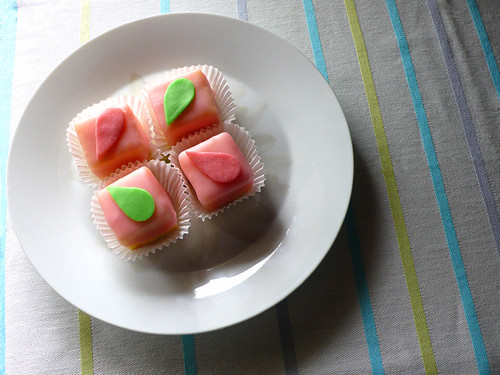


14 comments:
8/22/2007 07:59:00 AM
my little girl is so fascinated by these. I think her next yellow-coated endeavor may be mud petit-fours! (also thinking polymer clay petit fours might make nice birthday presents for her pals) my best to you!
8/22/2007 12:21:00 PM
Wow - that's a whole lot a tips - thanks! I haven't made these in over 30 years... it may be time to revisit them. I wonder how good chocolate rolled fondant is?
8/23/2007 11:37:00 AM
thanks for this wonderful post. I've been wanting to try my hand on this but never really got the chance and there was no occasion for me to make this. I'd love to try this...thanks again...your creations are pretty as always :)
8/23/2007 04:03:00 PM
they're so pretty! I'm so impressed. don't think I'd ever have the courage to attempt such a thing.
8/23/2007 10:47:00 PM
I love you blog and post! Thanks for including me in one of tyour links. I wanted to talk with you! Please email me at sarah@baking911.com I couldn't find your email! Thanks!
8/23/2007 11:59:00 PM
Santos, these are so lovely!
I have never made petit fours but have always thought about it. I love how delicate and beautiful yours look.
8/25/2007 09:11:00 PM
Hummmmmm...
:))~
8/26/2007 05:13:00 AM
They are so cute. I love the colors!
8/27/2007 12:45:00 AM
michelle, hello madame! i love the idea of polymer clay petit fours, you are one crafty mother, aren't you? ;)
cathy! and you don't have to be in a cast this time around!
hello anne,i hope you try these, i know you'd do a beautiful job of it.
stephanie, i was hesitant at first as i've had trouble with icings and fondant before, but once i started i quite enjoyed the whole process. i think you might too!
hello sarah, thanks for stopping by and commenting--baking 911 has been a cake saver on more than one occasion for me!
hello patricia! i don't think i'll ever be able to do the fancy gum paste flowers and intricate piping that some people do, so i'll just have to improvise with what i've got.
hello rebecca! :D
hi jerry! i love that little drop/leaf shape, it's very orla kiely....
8/27/2007 05:31:00 AM
I love the way you say "simple". They are beautiful and so patrician, heh.
8/27/2007 03:40:00 PM
(laughing) 'simple' is such a relative term....it changes daily too!
'patrician' !!!! excellent, acornbud. and true.
8/29/2007 02:39:00 AM
Wow- this post (along with the fondant one) is very educational for me!!! I looove petit-fours and now will be able to make them! Thanks!
9/10/2007 02:10:00 PM
Your petits fours are simply gorgeous yet so simple, I absolutely love them. Could you make something as pretty and as yummy for the muffin monday no.6? I am organising it and am scared there won't be many participants so am calling out to the beautiful blogs out there....
http://7lieues.canalblog.com/archives/2007/08/26/5993792.html
Hope to hear from you and keep blogcooking :-)
2/05/2009 12:28:00 AM
I came across this post via Google search for petits fours. This will be my first attempt and I really appreciate the detailed post. I will be making 3 dz or so for Valentine's Day but I think I should do a practice run with a small batch beforehand.
Thanks!
Karen
Post a Comment